1. Cut two 1-yard lengths of ribbon. Unwind the silk cord fully from its spool. Thread 1 bead onto cord, sliding it down and leaving a 5-inch tail.
2. To attach the ribbon: Holding bead on tail, use cord to tie a secure double knot at midpoint of 1 ribbon. Secure bead: Pull needle back through bead.
3. Knot tail and needle ends together next to bead.
4. Trim tail. Thread second bead; knot cord next to bead. Repeat to add remaining beads. After last knot, use cord to tie a secure double knot at midpoint of second ribbon. Pull needle back through last bead, and tie a knot around existing cord; trim end.
Here are the original instructions from Marthastewart.com. The picture might be helpful.
2. To attach the ribbon: Holding bead on tail, use cord to tie a secure double knot at midpoint of 1 ribbon. Secure bead: Pull needle back through bead (See No. 1 in image).
3. Knot tail and needle ends together next to bead (See No. 2 in image).
4. Trim tail. Thread second bead; knot cord next to bead. Repeat to add remaining beads. After last knot, use cord to tie a secure double knot at midpoint of second ribbon. Pull needle back through last bead, and tie a knot around existing cord; trim end.

Snappy Lobster Halloween Costume
This costume can be sized to fit a child of any age; only the claws and skirt require sewing. Lillian can clap her giant claws together or free her fingers to give a pinch through slits in the back of the felt mitts. Ping-pong-ball eyes bob on ends of pipe cleaners affixed to a cotton pilot's cap. A scalloped-edge skirt worn over a red snap-bottom T-shirt allows for freedom of movement.

Tools and Materials
Kraft paper
1/2 yard red felt
2 pairs Velcro dots
1/4 yard polyurethane foam
Four 1-inch-diameter red cardboard disks
2 red pipe cleaners
Glue
A red pilot's cap
Black permanent marker
2 white ping-pong balls
Snappy Lobster How-To
For skirt, create kraft-paper template (for top width, measure waist, divide by 2; add 3-by-1 1/2-inch tab). Cut 2 felt shapes from template; sew together along sides with 1/4-inch seam allowance (on left side, stop below tab). Turn right side out and sew on Velcro tabs as shown; iron.
For claws, use enlarged claw template to cut 4 shapes from felt and 2 from foam. Cut slit in 2 felt shapes as shown. Stack 1 foam, 1 slit felt, then 1 slitless felt shape; sew along edges, leaving bottom open. Turn right side out; iron; repeat for other claw.
For eyes, poke a hole in each cardboard disk with pin; push pipe cleaners through; loop at end; sandwich loop between disks; glue disks together. Cut small hole on both top sides of cap. Push pipe cleaner through; glue disks to underside of cap. Draw dot on ping-pong ball. Poke hole on opposite side; push pipe cleaner into hole. Repeat for other eye.
Spider Baby

-
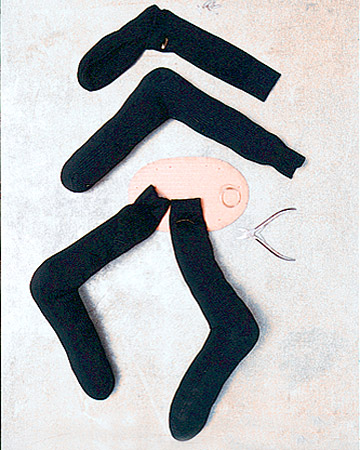
Step 1 Make Spider Baby Legs
Turn each of 3 pairs of men's microfiber black dress socks inside out. Tuck each ankle by 1 inch and safety-pin to make finished legs have sharper angles. Turn socks right side out; stuff with polyester-fiber stuffing. If safety pins show, blacken with permanent marker. Use shaded part of our template to cut out body from cardboard; punch holes as indicated. To attach legs, thread 24-gauge wire through holes, place sock on cardboard, and twist wire to secure.
-

Make Harness and Body of Spider
Step 2
To make harness, cut 2 pieces of 5/8-inch-wide black grosgrain ribbon 4 inches longer than baby's waist; stick self-adhesive Velcro on ends. Lay ribbons across spider, between legs; hot-glue onto cardboard. Using template, including unshaded part, cut body from black fake fur. Put some polyester-fiber stuffing on top of cardboard, place fur body over it, and hot-glue fur flaps to underside of cardboard. Place spider on baby's back, and attach at belly with Velcro-ribbon ties.
-

Make Spider Web Skirt
Step 3
For the spiderweb skirt, you can use a long black skirt with white yarn or a long white skirt with black yarn -- both look great. Wear a matching top. You may want to add a crinoline petticoat under the skirt for extra puff.
The knotting and pinning of the yarn is easier if done when the skirt is on a dress form or a person. Cut 8 pieces of yarn, each the length of the skirt plus 4 inches; these will become the vertical spokes of the web. Tie a small loop at both ends of each length of yarn. With small safety pins, attach loops of yarn to the inside of the waistband and the underside of the hem, sliding pins through loops to secure, and evenly spacing yarn around skirt.
For the horizontal lines of the web, cut 5 or more pieces of yarn, each of them measured to be at least twice as long as the circumference of the skirt at the point where you will place it; the yarn you fasten at the waist will be shorter than the yarn at the hem.
Starting from the waistband, tie each yarn to the spokes, letting it sag slightly between them. Dab white craft glue on the knots so they won't slip down the spokes. Space the horizontal yarns farther apart toward the bottom of the skirt, and add more sag.
*Lily Costume*

From:

Lily Costume
This adorable -- and comfortable -- lily costume for babies is perfect for families on the go this Halloween.
Tools and Materials
Costume foundation template
Stargazer or tiger-lily template
1/8-inch armature wire
Wire cutter
Masking tape
Tailor's chalk
Fabri-Tac fabric glue
Clothespins
Scissors
Green fleece for foundation
Green button (about 1 inch)
Clock face (for reference)
Needle and thread
Safety pins
Large plastic diaper pins
Baby hat
For stargazer:
Light-pink fleece for petals
Medium-pink felt for petal center
Dark-pink felt for dots
Orange felt for stamens
White extra-long "fat" chenille stems for stamens
For tiger-lily:
Orange fleece for petals
Brown felt for dots and stamens
Orange extra-long "fat" chenille stems for stamens
Lily Costume How-To
1. Print the costume foundation template and the stargazer lily or tiger-lily template at 200 percent.
2. To create lily petals, cut six 36-inch pieces of 1/8-inch armature wire. Form each piece of wire into a petal shape, following the wire frame guide provided in the template. Where the ends of the wire meet, secure with a few pieces of masking tape.
3. Once six petal frames are complete, lay each one down on a piece of orange fleece. At about 1/2-inch out from the frame, trace around the wire with tailor's chalk. Cut out patterns from fleece.
4. Lay a wire frame on top of a cut piece of fleece, center it, and apply fabric glue to a section of the wire. Carefully wrap the edge of the fabric around the wire. Continue working around the wire frame, using a clothespin occasionally to secure until dry. Do this for all six petals.
5. Cut lots of brown felt ovals in different sizes, (three examples are given in the template, but it's OK to approximate). Glue spots to petals, concentrating them more toward one end, which will eventually be what is the center area of the flower. For the Stargazer lily only, cut darker pink long teardrop shapes (shown in the template) from felt and glue along center of each petal.
6. Bend wire to form petals into a more curved shape.
7. Make the foundation piece: Trace the enlarged foundation template onto green fleece, and cut out. Sew a button to the tip of the triangle, as shown in the template. At the bottom corners of the triangle, cut two slices to form buttonholes.
8. Lay the foundation triangle flat with the button corner at the top. Lay four petals down on top of the foundation. (Using a clock face for reference, arrange them pointing in these directions, in this order: 5, 9, 3, and 7 o'clock). Pin in place and flip over. From the back, use safety pins to anchor petals to foundation piece (you can choose to hand-sew this if you prefer).
9. Wrap the lily around the baby carrier and button in place (you will find it is like fastening an upside-down diaper). Use diaper pins to secure the final two petals onto the baby carrier straps.
10. For the hat, create stamens with extra-long "fat" chenille stems. Glue felt "pollen" tips to each end, and bend the stems into a "V" shape. Glue each stamen into the fold of a store-bought baby hat.
Resources
Martha used fleece from milldirecttextiles.com and felt from magiccabin.com. Fabri-Tac is available from beaconadhesives.com. All other tools and materials are available at sewing and crafts stores. Special thanks to BabyBjorn for supplying the baby carriers used in this segment.
* Adult Costumes* From:

8 No-Sew Costumes: Bubble Wrap Jellyfish
Jellyfish How-To
Open umbrella. Cover metal or black parts with white enamel paint or white tape. For first 8 tentacles, cut strips of large Bubble Wrap on diagonal between bubbles; vary lengths by taping 2 or 3 strips end to end with clear packing tape. Tape a tentacle to inside rim of each umbrella panel. Now cut 16 strips of small Bubble Wrap 22 inches long and 5 inches wide; shred and twist 1 long edge of each. Cut 8 same-size strips of lightweight iridescent cellophane; sandwich each between 2 bubble strips; hot-glue smooth edges of tentacles to umbrella spokes. (Plastic will melt.)
Center Tentacle How-To
Cut 2 base strips from small bubbles, 10 inches wide and as long as you like; shred long edges. Cut 8 strips of small bubbles; shred 1 edge of each. Hot-glue smooth edges of 4 strips to each center strip -- each side. Tape thick tentacles to cross spokes at top of umbrella.

From:
8 No-Sew Costumes: Silk Leaf Swamp Couple
Start with a simple dress, jacket, and tie -- nothing you'll want to wear again in its original form. Have fun with the wide selection of silk and plastic leaves and flowers that are available; you need not follow our choices.
Dress How-To
We cut the sleeves off a thrift-store dress and covered it by hot-gluing silk spiderwort leaves interspersed with plastic maiden-hair ferns. Put a dab of hot glue at the base of each leaf, leaving tip free; start gluing from top of dress. Do a design with the leaves, let vines crawl up your dress, or go for colors and patterns with roses, daisies, or flower petals.
Gentleman's Tie How-To
First knot tie on wearer's neck, then cut through in back; use a safety pin to fasten in back for easy removal. We chose silk French-smilax vine, and hot-glued it onto the tie.
Jacket How-To
we hot-glued plastic cedar branches onto the body and plastic maidenhair fern onto lapels and pockets. To make hat from an extra-large leaf, make a tiny double loop from a 2-inch length of slender ribbon: Bring both ends to center of ribbon and glue in place; then hot-glue ribbon loops to back of leaf. Attach with bobby pins through loops.
From:
Making Halloween Masks
Making your own Halloween costume is fun, but it can be time-consuming. This year, why not make a mask? Preserved leaves, flower petals, and feathers can be used to create masks that have the impact of a complete costume; they're playful enough for any trick-or-treater yet elegant enough for a Halloween ball. Preserved Leaves, Flower Petals, and Feathers can be used to create masks that have the impact of a complete costume; they're playful enough for any trick-or-treater yet elegant enough for a Halloween ball.
The masks featured here, some of our favorites, are all made using one simple technique. Basic, unadorned masks come in several shapes and sizes and can be found at costume and novelty shops; everything else you'll need is available at florist's and crafts stores. For some truly exquisite embellishments, try a milliner's-supply store -- or even your own backyard. Here we've used (above, from top to bottom): preserved maple leaves, preserved red-oak leaves, preserved lemon leaves, and dried hydrangea petals. The masks shown below were made using (from left): fabric rose petals, feathers, and vintage paper flower petals.


Dyed Canvas Sneakers
Canvas sneakers are comfy and cool, but you may not find them in colors you want. Put a spring in your step by setting the shade yourself. With fabric dye, its a cinch to match them to your wardrobe or your mood.
Tools and Materials
Large basin or bucket
Liquid fabric dye
Salt (if needed; check dye directions)
White canvas sneakers, laces removed
Dyed Sneakers How-To
1. Fill basin with hot water. Add dye, and salt if specified, to water, following manufacturer's instructions for sink or bucket dyeing.
2. Wet sneakers with hot water, and place in dye bath.
3. Stir for amount of time stated on dye bottle. Rinse as directed.
4. Air-dry shoes, or place in dryer.
5. Clean basin immediately to avoid staining.
|
|
| From:
Bias Toward the PrettyIn sewing, as in many areas of life, it helps to have a few reliable shortcuts. Count bias tape among them. Made from strips of folded fabric, bias tape is a multitasking trim that's utilitarian yet fashionable. It binds raw edges quickly and, unlike strictly decorative materials such as ribbon or flat trim, travels around curves with ease, never puckering. Whether you want to redo a hem, add a flourish to everyday items such as bath towels, or make functional details such as loops on pot holders and ties on seat cushions, bias tape can make your life easier.
Store-bought bias tape is widely available, but only in a small selection of solid colors. Although plain hues work well with patterns, there's no need to limit yourself. You can easily create your own bias tape in bright prints from almost any woven fabric. Quilting-supply shops offer an exceptional variety, but you also can find inspiration in your sewing stash, a floral-patterned pillowcase, or vintage clothing. Whether you seek a design that's modern or classic, playful or elegant, making your own bias tape ensures your project turns out to be exactly what you want. Bias-Tape Basics
Bias-tape makers come in a variety of sizes, creating strips of fabric 1/4 inch to 2 inches in width. Use a medium-weight woven fabric, such as quilting cotton or summer linens. These instructions are for making single-fold tape.   
1. Start with 1 yard of fabric. With dressmakers' chalk and a clear quilting ruler, mark strips at 45-degree angles, one beside the next. (To determine the width of the strips, see instructions with bias-tape maker.) Cut out strips.
2.To create longer lengths of bias tape for larger projects, join strips end to end as follows: Place two strips, right sides facing and diagonal ends aligned, at a 90-degree angle. Stitch in place with a 1/2-inch seam allowance, backstitching to secure. Press open with an iron. Snip corners. 3. Feed one end of fabric into bias-tape maker, pulling 1 to 2 inches of fabric through the other side. Pin bias tape to ironing board to hold it in place. Press with iron. Continue to pull strip through bias-tape maker, ironing as you go. 
Types of Bias Tape
A bias-tape maker creates single-fold bias tape, top, that works on almost any project requiring trim. Store-bought double-fold bias tape, above, is folded lengthwise a second time; its crisp crease makes quick work of large projects. 
One-Step Binding
To bind raw edges or embellish seams, slip bias tape over the edge of the project. Pin to secure. Stitch 1/8 inch in from tape's edge, making sure needle passes through underside of tape. 
Fold-Over Finish
To prevent fraying at edges, cut bias tape 1/2 inch longer than required. Stop stitching about 1 inch before the tape's end. Open the bias tape like a book; fold end over the edge of the project's fabric. Close bias tape, and stitch in place. 
Overlap Finish
To prevent fraying on continuous bindings, cut bias tape 1 inch longer than required. Stop stitching about 1 inch before completing project. Open the bias tape like a book; fold under 1/2 inch at end. Close bias tape, and stitch in place.

Tote How-To
1. Using our tote template, cut out two handles, two bag pieces, one small pocket, and one large pocket from 1 yard of medium-weight cotton canvas. 2. Using 6 yards of store-bought double-fold bias tape, bind both edges of each handle and edges of large and small pockets and both bag pieces. 3. Press under 1/2 inch of both ends of each handle and pin to each bag piece, folded edge of handle facing the right side of the fabric, 4 1/2 inches from the top edge and 4 inches in from sides of bag. (The handle will twist, as shown below.) Stitch handles to bag using two horizontal stitches, 1/8 and 1/2 inch from folded edge; backstitch for reinforcement. 4. Stack a small pocket on top of a large one, side edges aligned; pin both to right side of one bag piece. Starting at bag's bottom and stitching through all layers, sew up center front of pockets; backstitch to reinforce. 5. Stack pieces, wrong sides facing and edges aligned. Bind front of bag to back with bias tape, beginning and ending with a fold-over finish. |

From:
Good Thing: T-Shirt Bag
Turning an old T-shirt into a reusable shopping or grocery bag is a simple, clever craft to help everyone be "green." It's a Good Thing that will help protect the environment.
Tools and Materials
Heavy-weight cotton T-shirt
Pins
Sewing machine
Medium-size bowl
Water-erasable marking pen
Scissors
T-Shirt Bag How-To
1. Turn T-shirt inside out and pin bottom of the T-shirt along the hem. Using a sewing machine, sew bottom of T-shirt closed. Flip shirt right side out and lay flat on table, making sure all seams are lined up.
2. Place medium-size bowl about half-way over the neck hole. Using a water-erasable marking pen, trace along the edge of the bowl. Cut along the outline, making sure to go through the front and back sides of the shirt, in order to create an opening for the bag that's larger than what the neck hole allows.
3. Line up the hems on the front and back side of the sleeve and cut, making sure to go through both sides of the shirt. Repeat on the other sleeve. Tip: A jersey shirt would also work well for this craft, as it is already sleeveless, and it's made of a great mesh material.
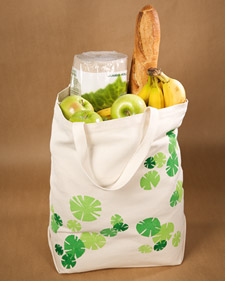
These fashionably printed grocery totes will have you saying "no thanks" to plastic bags.
Tools and Materials
Organic cotton tote bag
Potatoes and/or apples
Kitchen knife
Fabric or acrylic paint
Linoleum cutter
Paintbrush
Printed Grocery Tote How-To
1. Cut a potato in half. Carve a simple design into the potato using a linoleum cutter. Tip: Apples cut in half, carved or uncarved, also make great designs.
2. Brush paint onto the carved surface, being sure to cover it entirely.
3. Stamp with the potato on the cotton tote. Re-ink and stamp as many times as desired.
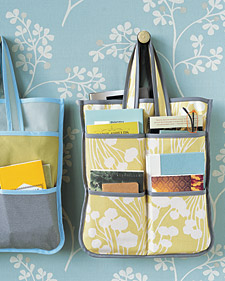
(CAN YOU TELL I LIKE TOTE BAGS AND ALL PURSES AND BAGS IN GENERAL!?) Removable Tote Organizer

This handy three-pocket pouch can easily be fashioned from a carpenter's canvas nail apron (available at hardware stores). Cut off apron straps. Sew buttons and loops of twill tape (12-inch strips folded in half) to opposite sides of the apron at the same spot, 1 inch from top edge and spaced to match up with tote's handle straps. Place apron in tote; wrap twill tape around tote handles, and pull buttons through loops.
A Brand New Bag
Tote bags always live up to their name, whether they're taking towels to the beach, fruit from the farmers' market, or gardening supplies to and from the shed. But there's no reason these humble helpers need to look humble. The addition of a bold initial or vivid pattern can make a canvas bag newly stylish -- and unique to its owner.
Start with a plain canvas bag from a crafts store, and approach it just as you would (suitably enough) a blank canvas. Do you want to add a modern design? Pretty labels? Handy pockets? The ideas here are just a beginning.
Many bags can be transformed with one easy technique: ironing on a design. Vary the art or lettering you affix, and you can customize totes for different family members or specific activities. (Try our Books and Knitting templates, scan art from books, or download from CD-ROMs or the Web.)
Other add-ons involve only simple stitching. Create inside dividers with one quick trick: Sew in a row of pockets from a children's apron. Or fashion outer pockets from fabric. You can spruce up handles, too. Line them with ribbon or replace them with twill tape.
Your tote will hold new appeal -- and not just because of what it's holding.
Iron It On
Tools and Materials
Scissors
Iron-on transfer paper (available at office-supply and crafts stores)
Plain canvas tote bag
Iron
Twill tape or grosgrain ribbon for handles (optional)
Iron-On How-To
Cut around images cleanly to avoid making jagged edges. Following transfer-paper manufacturer's instructions, print images on transfer paper in black or in color and cut them out. Arrange images on bag, face up, for a preview (keeping in mind this is a mirror image of final design). When you're ready to iron, place images face down. Iron over images, starting at edges of each and using even pressure so the image doesn't slide. When iron-ons have cooled, remove backing paper. Replace bag handles with colorful twill tape or cover them with ribbon, if desired.
Add Pockets
Tools and Materials
12 1/2-by-19-inch canvas
Tote bag
Seam ripper
Scissors
Fabric for pocket
Measuring tape
Thread
Fabric glue or pins
Twill tape or grosgrain ribbon
Children's apron with pockets
Pockets How-To
Begin by removing existing handles with a seam ripper.
1. To make outer pockets: Cut two pieces of fabric 6 inches narrower than width of bag. Cut one of these pieces 2 inches shorter than height of bag. Cut remaining piece 5 inches shorter. Fold over top 1/4 inch of each; hem. Stack small piece onto large piece, aligning at bottom. Center on bag; glue or pin into place. Machine-stitch bottom. For handles, cut two pieces of 1 1/4-inch-wide twill tape twice the height of the bag plus 20 inches. Attach with glue or pins, covering sides of pocket. Attach other handle. Stitch along both sides of each tape. Reinforce handles at top and bottom of bag.
2. To make inner pockets: Cut off apron top. Glue or pin lower portion in place. Fold over top edge by 1/4 inch; stitch into place.
Thanks Martha! haha
Beach-Towel Tote Bag
Turn bathroom towels into an all-in-one beach mat and tote bag. Start with 1 hand towel and 1 bath towel in the same color (length of hand towel should equal width of bath towel).
For handles, sew a 3-inch section from each end of a 21-inch length of webbing to center of 1 long side of hand towel. Repeat on 1 short side of bath towel. Place hand towel on bath towel, so handles are aligned and facing. Stitch towels together along 1 long edge of hand towel, leaving sides with handles open.
To form sides of bag, stitch along short sides of hand towel, 4 inches in from edges (or along decorative stripes), creating a pocket. Flip inside out, and tuck length of bath towel into pocket. At the beach, turn inside out, and unroll the towel to use as a mat. If you prefer, stuff the pocket with a soft item to make a pillow.

From:

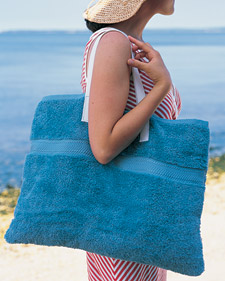
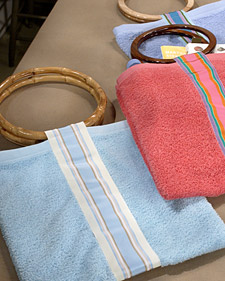
Hand-Towel Beach Bag
With ribbon, Velcro, and a few basic supplies, you can transform an ordinary towel into a stylish beach accessory. You can use virtually any size towel and ribbon you like (Martha uses a 16-by-28-inch terry-cloth hand towel and 2 1/2-inch-wide grosgrain ribbon). For the handle attachments, there are several options (Martha uses circular wooden rings); just be sure to remove the handles before washing the bag.
Tools and Materials
Velcro
Towel
Preshrunk, washable ribbon
Binder clips
Pins
2 circular handbag handles
Hand-Towel Beach Bag How-To
1. Attach the Velcro to the towel: Machine-sew a 2-by-2-inch square of female Velcro to the center of each end of the towel. (Be sure to sew the Velcro to the side that has the label, which will be the inside of the bag.)
2. Attach the Velcro to the ribbon: Cut the ribbon to the appropriate length (for a hand-towel-size bag, cut 1 yard). Sew a 2-by-2-inch square of male Velcro to each end of ribbon. Fold over the ends of the ribbon, and fold over again, creating two folds. Hold the ribbon in place using a binder clip, and tuck the Velcro under the fold. (Folding the ribbon over protects it from fraying and creates a neater line.) Once the Velcro is secured in place, sew each side of the Velcro onto the ribbon.
3. Attach the ribbon to the towel: Pin the ribbon down the center of the towel, making sure the Velcro is on the underside. (There should be an even amount of ribbon hanging off each end of the towel, about 4 inches, which will be wrapped around the handles, attaching them to the bag.) Machine-sew the ribbon onto the towel.
4. Fold the towel in half so the two top ends meet and the ribbon is on the inside (the bag will be inside out at this point). Sew up the two sides, leaving a 1/2-inch allowance, and turn the bag right side out. Wrap the ribbon hanging off each side around each handle attachment, and attach the Velcro to the bag.
Library Card Book Pocket Template
Note: After printing verify that the template measures about 7.5 inches tall.